# Exporting
Once you are happy with a design, you can export it as a regular static website, consisting of HTML, CSS, JS and images. Bootstrap Studio makes this easy - just click the Export button from the main toolbar or use the Ctrl/Cmd + E keyboard shortcut.
# Export Settings
A number of export settings are available, which can affect the way HTML code is generated.
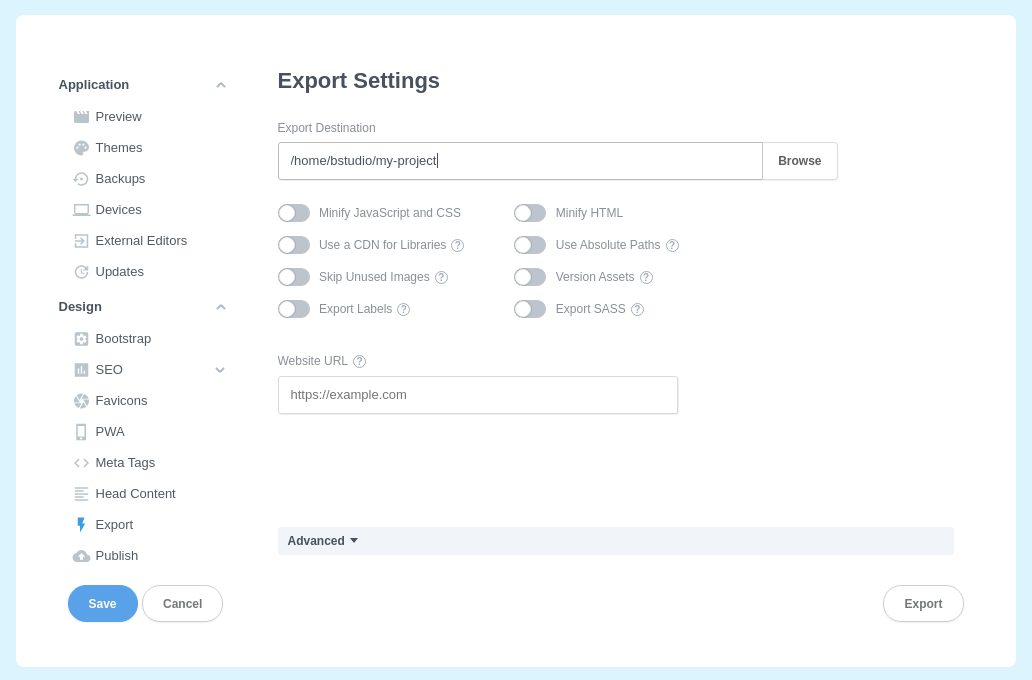
Here is a quick rundown of the options:
- Minify JavaScript and CSS - All extra whitespace will be removed from .js and .css resources, reducing their file size but also making them harder to read.
- Use a CDN for Libraries - The jQuery library, bootstrap framework resources and used icon fonts will be linked from a CDN provider for extra performance. When disabled, they are included as local files.
- Skip Unused Images - Will scan whether the images you've imported in your design are used or not, and will write to disk only ones that are.
- Export Labels - Labels are additional text elements that are shown next to your components in the Overview panel. Normally, they are ignored when exporting, but if you enable this option, they will be inserted as
<!-- Start: XXX -->and<!-- End: XXX -->comments in the HTML. - Minify HTML - Enable this option to have extra whitespace removed from the exported HTML.
- Use Absolute Paths - All page, CSS, JS, image, and other resource URLs will be prefixed with a forward slash (/).
- Version assets - When enabled, this option will append content hashes to all assets URLs, forcing the browser to always refresh new version of said resources (cache busting).
- Export SASS - If you have SASS files in your design, switch this option on to have the SASS sources exported. By default only the compiled css is written to disk.
- Website URL - A text input to enter the URL on which you plan to upload your website. It is used when the app generates sitemaps and Facebook/Twitter meta tags.
Save your settings, and when you next click the Export button, your design will be written to the folder you've selected.
# Exporting a Single Page
If your design consists of multiple pages, you may export only a specific one. Just right click the page in the Design panel and choose Export. This will write only the selected page and alongside the CSS and Image files that it uses.
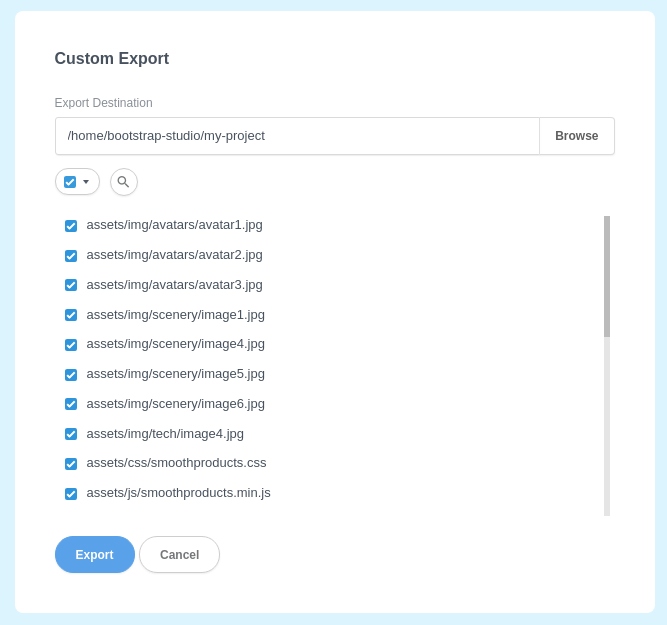
# Custom Export
For a more fine-grained experience, you can choose the File > Export > Custom Export menu. In the dialog you can filter files by type and select only the files that you wish to export.
# Export Scripts
For power users of the app, there is also the option to configure Export Scripts. This advanced feature lets you program a script that will run every time you export your design. You can use them to rename files, move images, run things like eslint (opens new window) or even upload your site automatically to your server.
To do any of this, you need to be comfortable with writing code. This is why the feature is hidden in the Advanced area in Export Settings:

You point it to an executable file somewhere on your disk. This can be a shell script or a compiled program. The only requirement is that it can be run from a terminal and doesn't wait for user input.
# Mac/Linux
For macOS and Linux, shell scripts are a simple yet powerful option for writing export scripts. The export destination path is passed as arg 1, so you need to cd $1 in order to navigate to the folder with the exported files.
Here is an example, written in bash, which changes the extension of your index file to php:
#!/bin/bash
cd $1
mv index.html index.php
Remember to mark the script as executable, so that the OS can start it as a program:
chmod +x yourscript.sh
For more complex tasks, you can write your scripts in Node, Python, Ruby, PHP or anything else that you feel comfortable with. Just make sure that the script is marked as executable, and that the #! row is added, so that the interpreter can be located by the os.
# Windows
For Windows, regular batch files or compiled programs would work. The export destination path is passed as arg 1, so you need to cd %1 in order to navigate to the folder with the exported files.
Here is an example of a batch file which renames your index.html file to php:
@ECHO  OFF
cd %1
move index.html index.php
Save this as a text file with the bat extension. This is needed so that Windows knows to execute this file as a program.
Important
- A lot of Windows batch examples you can find online add a PAUSE command at the end of the script. Don't add this to your export scripts, as it will case the script to hang and take up memory when it's started by Bootstrap Studio.
- If the script and the export destination are on different drive letters (say
C:andD:) thecdcommand above will not work. The solution is to add the/Dflag:cd /D %1
Learn more (opens new window).
An alternative for writing your scripts is to use Python and py2exe (opens new window) to compile your script as an executable.
# Setting the Script to Run
All that remains is to tell Bootstrap Studio to run your script upon export. With your design loaded, open the Settings dialog and select the Export entry on the left. Then, expand the Advanced section, click the Browse button and locate your export script.
# Error Handling
If your script throws any errors or log messages, they will be written to an error.log file in the export folder. You can use it to debug potential issues.
You can check out a more complex example for publishing your website to Github Pages automatically after an export.
← Importing Previewing →