# Hosting Custom Domains
Publishing your design to one of our free xxx.bss.design subdomains is straightforward. To host a custom domain like example.com on our platform takes a few more steps, which we'll cover in this guide.
# Getting a Custom Domain
First and foremost, you need to have a domain name that you wish to host on our platform. You can host the bare domain (example.com) or a subdomain (www.example.com, site.example.com etc). If you don't have one already, you can register your domain with a number of reputable domain registrars like Namecheap.
# Setting up CloudFlare
Set up CloudFlare (opens new window) for your domain. They offer a generous free tier and have guides for every domain name registrar (opens new window). It may take a few hours for the DNS changes to propagate, but your site will remain online the entire time.
Note
CloudFlare isn't strictly required (you can point your domain to our service without them) but they are the only provider that can issue an HTTPS certificate for your domain, and they support CNAME flattening, which allows you to point your bare domain to us.
# Creating a Site with a Custom Domain
As you saw in our previous tutorial, creating a new site is done from the Cloud > Manage Websites menu in Bootstrap Studio, and then pressing the Add Website button.
This opens the Create Website dialog, where you need to choose Custom Domain in the dropdown, enter your domain, and click Check. You can see the result below.
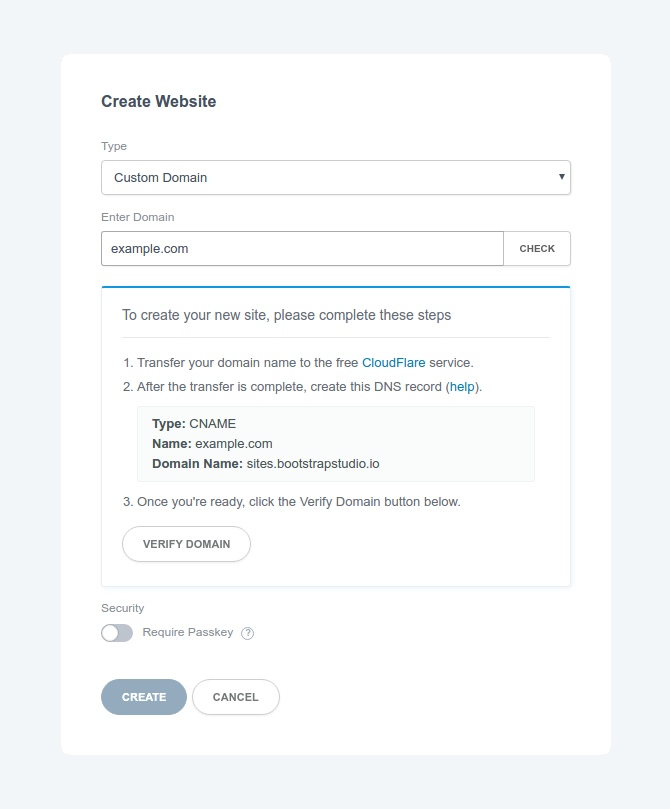
After your migration to CloudFlare is complete, you can continue with the next step.
TIP
If your domain contains characters from an international (non-latin) alphabet, you can paste the punycode encoded version (opens new window) (like xn--e1aybc.com) above.
# Creating a DNS Record
This is the most crucial step in the entire process. In the CloudFlare dashboard, select your domain name and in the DNS tab, fill in the settings you were given in the previous step.
Important: Make sure that the cloud icon is orange. If it is gray your HTTPS and hosting will not work.

Then, just click the Add Record button. If you already have an A/CNAME record for this exact host name (example.com here), you may see an error message. Removing the record with the same host name will allow you to create the CNAME without issues. Be careful what you delete. Write in our forums (opens new window) if you have questions regarding this.
Note
If you want the www version of your website (www.example.com) to work the same as the non-www version (example.com), you will need to configure a redirect in CloudFlare's control panel (opens new window).
# Switch Encryption Mode to Flexible
On the SSL/TLS > Overview screen in the Cloudflare control panel, make sure that the encryption mode is set to Flexible:
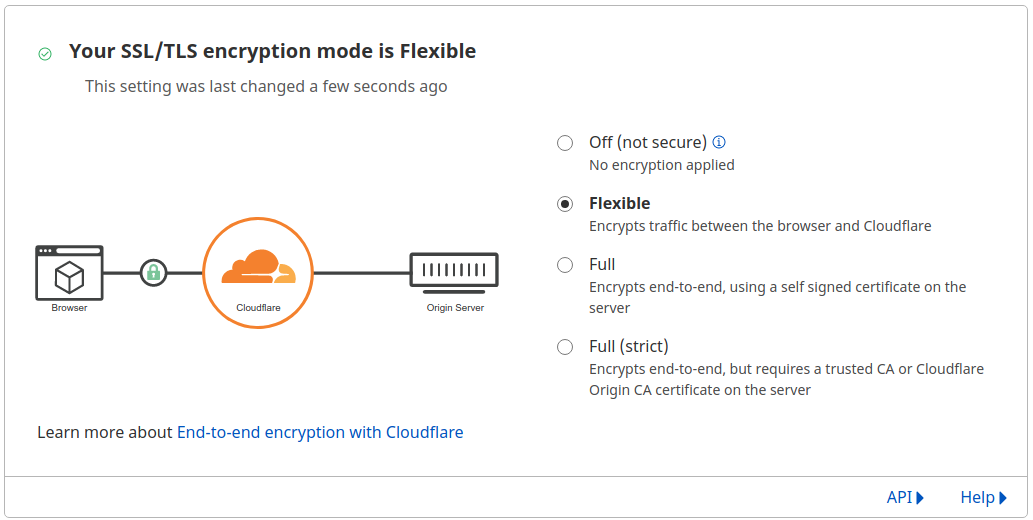
This is required so that Cloudflare can connect to our hosting platform successfully.
# Verify your Domain
Wait for a couple of minutes after you've done the above DNS change, so that it can come into effect. Then click the Verify Domain button in the Create Website dialog. Your domain will be validated, and your site will be added to our platform.
From that moment on, you will be able to publish with a single click from Bootstrap Studio and host your site on our powerful hosting platform.